Tool for importing business processes from various process tools into the Enterprise Architect application to BPMN 2.0 notation + other supporting elements from UML or ArchiMate 3 notation. At present, the BOC Adonis tool is fully supported, but expansion using other tools is expected in the future (ARIS, Cubetto and possibly others – depending on the interest in this tool).
Please note that the German version of BOC Adonis uses a different xml export format, so you need to use the correct command to load it. See below.
Adomig G3 is great, for example, if a company or organisation wants to move from another process tool to Enterprise Architect but is prevented from doing so by the fact that it has a large amount of content created.
What can Adomig do at the moment, and on which data does it work?
- It transmits Adonis process models, either collectively or individually. Batches of 240 processes in one conversion have been tested. The import format is XML that can be exported from BOC Adonis.
- It converts notation from proprietary BOC Adonis notation to BPMN 2.0 based on a defined bridge. (For example, Adonis activities automatic are converted to BPMN ServiceTask and semi-automatic to BPMN UserTask. Adonis Parallel is converted to BPMN Parallel Gateway, etc.).
- It transmits the exact form of diagrams, including swimlanes, and placement of elements, and on the diagram, stretching and correct wrapping of links so that the transferred diagram looks the same as the original one (except for elements, of course, which, due to the notation change to BPMN 2.0, may look different). There is no need to redraw processes manually.
- It is able to identify subprocesses and correctly map them to the relevant activities, including click-through settings.
- It creates swimlanes and sets the appropriate classifiers for them (so impact analyses can then be performed in EA).
- It takes support applications, roles, RACI and documents (input, output and/or reference) from BOC Adonis and maps them to the relevant process activities based on user configuration. Different types of links or defined tagged values can be used for mapping.
- It takes element names, element descriptions, conditions (gateway), parallelisation/synchronisation and more.
Basic view of the application
The Adomig 3 interface consists of several components:
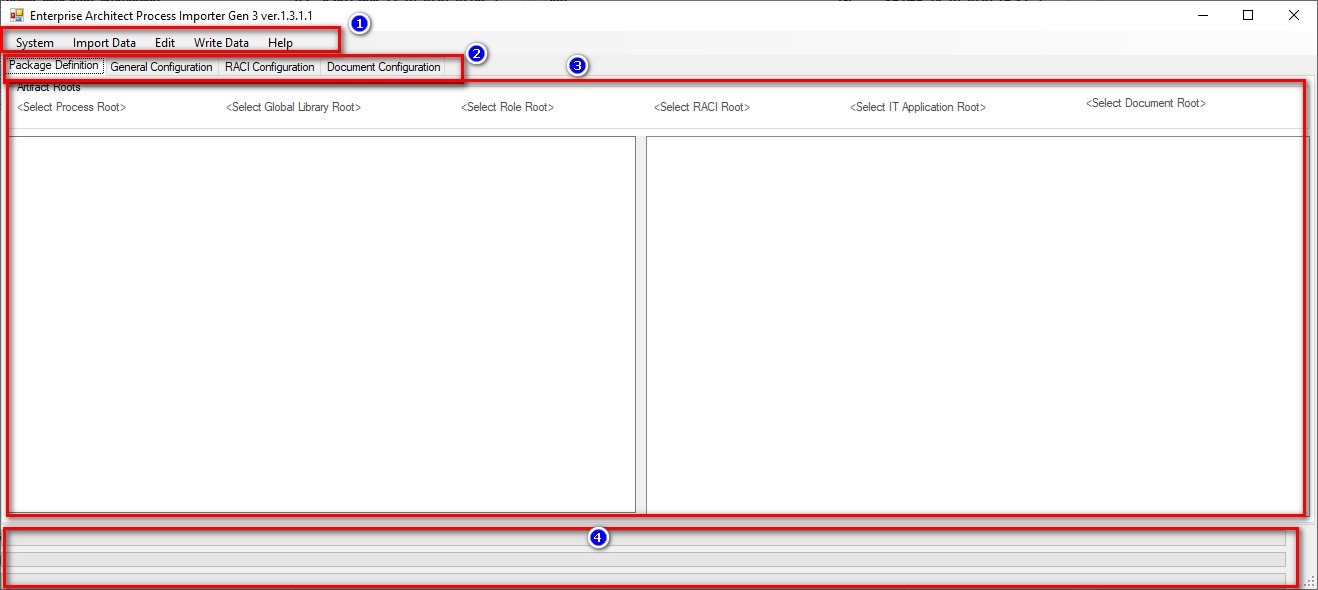
- Main Menu – contains basic application commands, such as loading source files, connecting to EA repository, writing processes, etc. The individual items will be described later in this text.
- A set of tabs that configure how the data will be written to Enterprise Architect. The individual tabs will be described later in this text.
- Custom forms in which the configuration takes place. The individual forms will be described later in this text.
- Three progress indicators (progress bars) that show the status of imports. The first progress bar (at the very top) shows the processing status of the complete batch import (i.e. processes). Each shift of this progress bar means a complete imported process, and once this progress bar reaches the end, the import is complete. The second progress bar shows the processing of individual swimlanes of one process, and the last one shows the processing of process steps within one swimlane.
Adomig G3 Tool Manual
In this section you will find a user manual describing how to use the application.
Loading processes
First, you need to load the data (processes) to be imported into Enterprise Architect. Each of the supported tools has its own defined import format. In the case of BOC Adonis, it is an XML file. To load processes (for BOC Adonis), proceed as follows. (The following steps are performed in Enterprise Architect, not Adomig G3):
Prepare an empty EAP file; (Processes can be imported directly into an existing repository, but it is not recommend very much.) In the created EAP, prepare at least two branches, one for processes and the other one for other elements (IT Applications, Documents, Roles, RACI) to which the imported processes will be mapped.
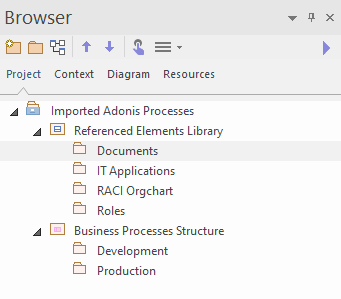
If you already have some elements to map in the Enterprise Architect repository, you need to have them ready in EAP. In this case, Adomig will link them to the processes (identify them by name). If elements (IT Applications, Roles, Documents, RACI) are linked in the imported processes that Adomig does not find in the prepared EA Repository, it will create these elements itself based on the user configuration.
For the purposes of this guide, you will have prepared IT Applications used in the processes, Roles, RACI and Documents created by the Adomig application.
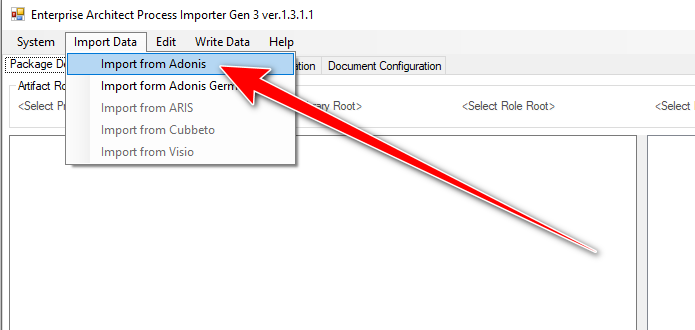
Export (into XML) one or more (whole set) processes from the BOC Adonis tool. It is necessary to make sure that the processes are exported, including the so-called Process Group, if they are included in them. Then load them into the Adomig G3 application. It is done with the command Main Menu / Import Data / Import from Adonis. Attention: if the XML were created by the German version of the Adonis tool, it is necessary to use the command Main Menu / Import Data / Import from Adonis Germany.
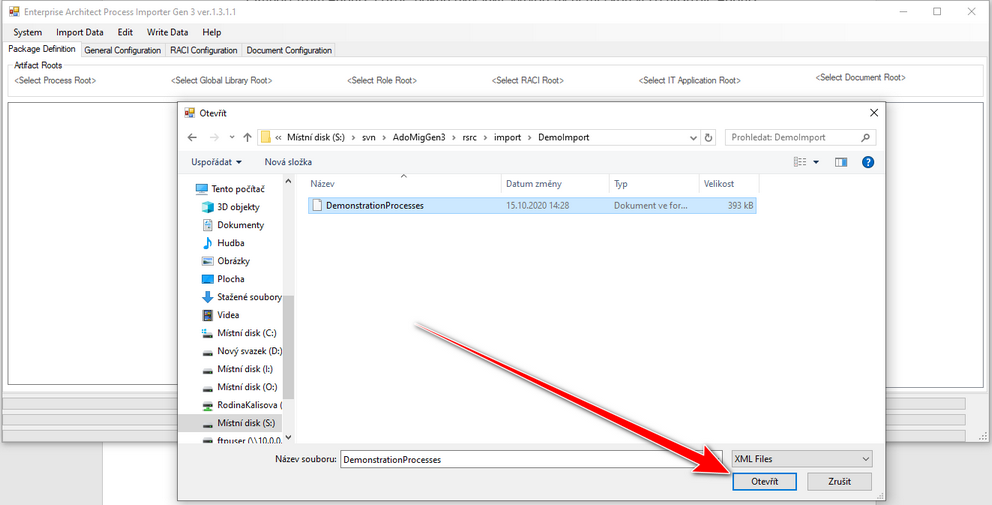
The standard Open File Dialog will be displayed. It is necessary to select in it an xml file containing Adonis elements. Click Open. If we do not select the XML file, a warning message will be displayed, and no action will be taken.
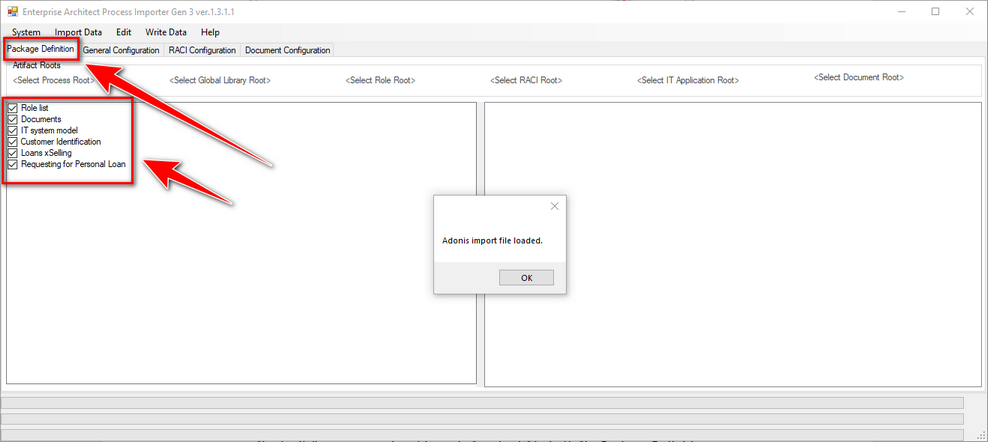
Adomig F3 analyses the loaded file and lists the identified processes in the check box located on the left side of the Package Definition tab.
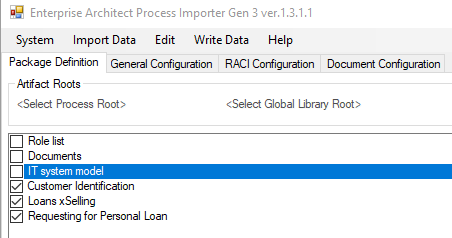
A user selects the processes (models) he/she wants to import. It is done by simply checking/unchecking the appropriate processes. A user can also use the Main Menu / Edit / Select all Processes or the Main Menu / Edit / Deselect all Processes functions, which select or deselect all items in the list. If a user wants to import everything that is loaded from the appropriate XML, he/she does not have to take any action.
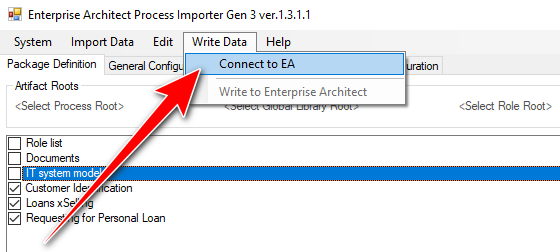
Connection to the Enterprise Architect tool
Now you need to join the Enterprise Architect project. This is done with the command Main Menu / Write Data / Connect to EA. The Open File Dialog will appear. Select the EAP file. The EAP file can be a physical Enterprise Architect repository file or an EAP shortcut that references the RDB repository. Adomig G3 can work with both.
Adomig G3 connects to the repository after selecting the EAP file. If it is in the repository (both physical on the disk and in the RDB), a login dialog will be displayed. A user logs in with a valid account – it is necessary to make sure that this account can be entered into EA. Connecting to the repository can take up to a minute.
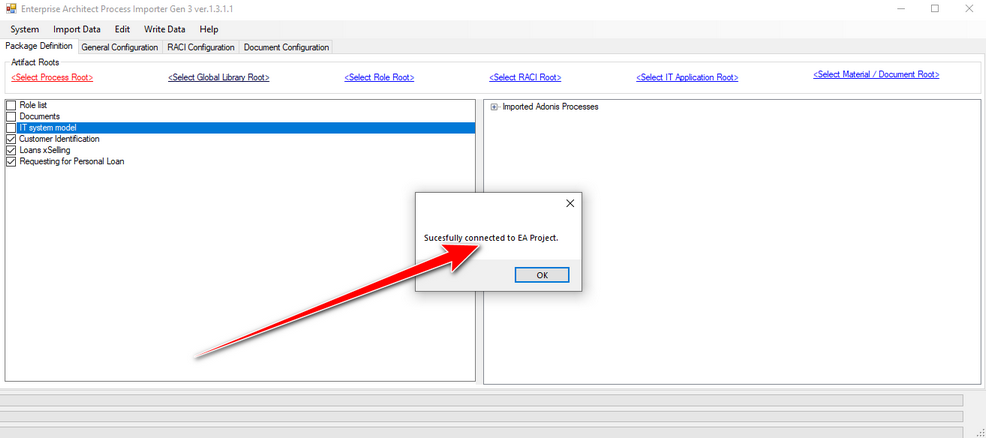
After connecting to the repository, a tree will appear in the right part of the Package Definition tab, which corresponds to the structure of the loaded EA repository. Therefore, this is the same data that appears in the Enterprise Architect tool itself in the Browser window. Unlike it, however, it does not display elements, only the package. This Adomig G3 tree uses Lazy Load, so there is no need to be afraid to click through even very large repositories.
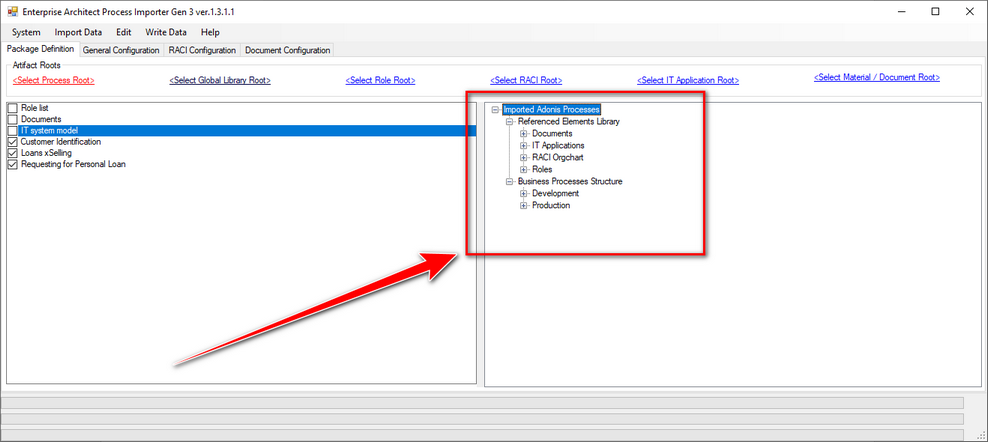
Now it is time to configure the appropriate packages. That means to set up Adomig G3 to know where to search and where to store processes and elements to map to processes. To do this, select the appropriate branch in the tree and click on the link that indicates the relevant packages. If you click on the link, the packages will be set as the source of the elements and at the same time the link takes the name of this package. Additional settings apply to each artefact, which will be discussed later in this text.
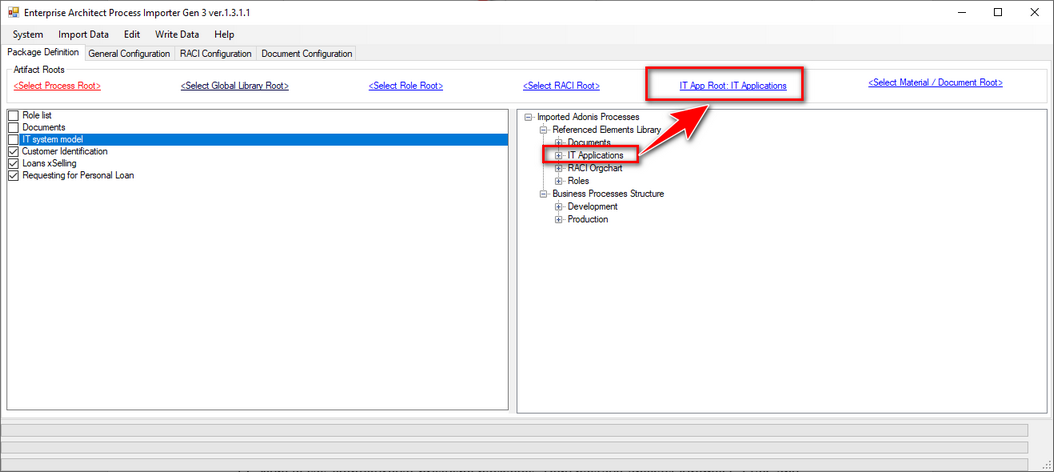
Meaning of individual links:
- <Select Process Root> – Created processes will be stored in this package. If the original Adonis process is included in Adonis in the so-called process group (which in EA corresponds to the process group package), the process will be included in the corresponding package in EA as well. If such a package does not exist, it is created. Processes not assigned to any process group will be created directly in the selected package (i.e. root).
- <Select Global Library Root> – if you set the package for other types of artefacts (roles, documents, etc.) separately, you do not need to set this package – it can be used as a common root for all types of library elements.
- <Select Role Root> – elements from this package will be used for pools / lanes classification (i.e. Adonis Swimlanes in this case). ArchiMate Business Roles are typically used as elements, but this can be configured (as described below).
- <Select RACI Root> – elements from this package are used to define the RACI matrix (Responsible for Execution, Accountable, Consult, Inform), and it is typically ArchiMate Business Actor, though it can be configured (as described below).
- <Select IT Applications Root> – elements from this package represent applications or information systems and are mapped to process activities where the relevant applications are used. Typically, ArchiMate Application Component elements are used, but this can be configured (as described below).
- <Select Material / Document Root> – elements in this package serve as input/output documents or other artefacts (in/out) and then as so-called referenced documents (a specialty of the Adonis tool). Typically, ArchiMate Business Object / Contract elements are used, but this can be configured (as described below).
Rules for evaluating packages (e.g. documents):
- If <Select Material / Document Root> is set, documents will be searched and created here.
- If not set, <Select Global Library Root> will be used.
- If neither is set, <Select Process Root> will be used instead. It must already be set, and the import cannot be performed until it is.
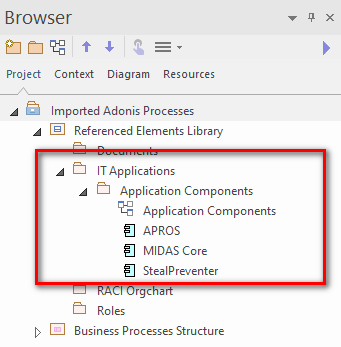
Example of mapping packages
In our example, fully configured packages look as follows:

General Configuration tab
Switch to the General Configuration tab. The tab contains several sections, which will be discussed individually below.
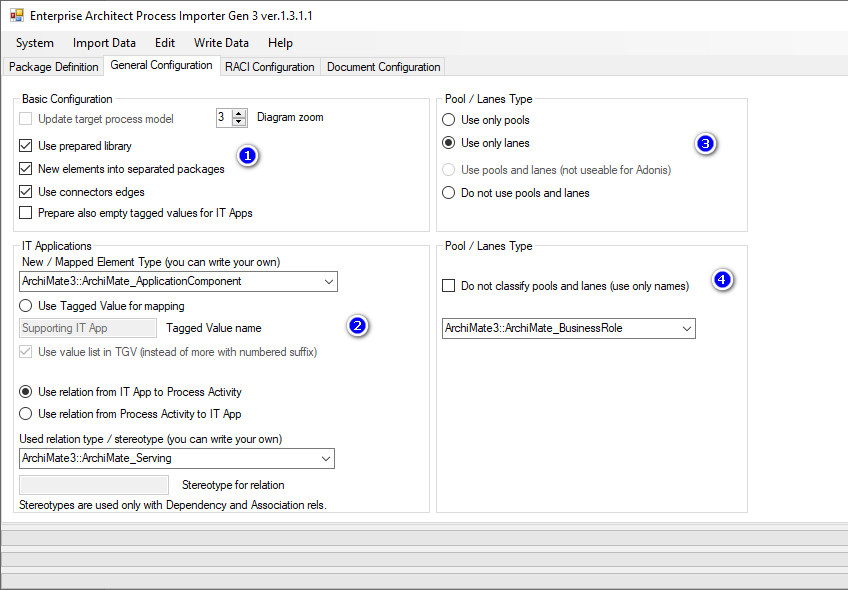
The sections:
- Basic configuration – here the basic parameters influencing the import are set.
- Applications / IT system import settings. On the Package Definition tab, it is the <Select IT Applications Root> package.
- Pools / Swimlanes settings on the Package Definition tab, it is the <Select IT Applications Root> package.
- Additional settings for pools / lanes
The items in the Basic Configuration section (1) have the following meanings:
- Update target process model – currently not implemented, it is a situation where processes in EA will be updated instead of creating them.
- Diagram zoom – recalculation of the diagram size. If we leave the value 1, then the diagram from Adonis will be transferred in its original size. Increasing the value in the field reduces the diagram. (This is because diagrams in Adonis are usually unnecessarily large.) The best value, based on experience, is 3. A lower value is suitable to use, for example, if the links in EA are too short or if the elements overlap lanes or each other.
- Use prepared library – if this option is checked, Adomig G3 will try to find existing elements in packages that have been set on the Package Definition tab. If not checked, Adomig G3 ignores existing elements and creates new ones during import. If the checkbox is checked, Adomig G3 will first try to find an existing element, and only if it does not find it, it will create a new one.
- New elements into a separated package – if this option is checked, Adomig G3 places newly created elements into a separated package (which it creates itself). This package starts with the bottom underscore and the name of the root package, e.g. _role, _RACI, etc. This option is especially useful when you want to separate the newly created elements from the original ones.
- Prepare also empty tagged values for IT Apps – if the mapping type Use Tagged Value for Mapping is selected in the IT Applications (2) section, the Adomig G3 application will also create empty tagged values, i.e. also for activities where no system is actually mapped. This option can be used to prepare a tagged value so that it can be easily used later in EA, and the user does not always have to create it manually.
Items in IT Applications section (2)
- Combobox named New / Mapped Element Type (you can write your own) – this selection defines what type the newly created element will be (for example, the application that Adomig G3 should map to the activity but will not find it and must create a new one). These are, for example, ArchiMate Application Component, UML Component, etc. A user can enter another type of element if he/she knows the correct type/stereotype and writes it to the combobox.
- Use Tagged Value for Mapping - if this option is checked, applications / IT Systems will be mapped to activities using tagged values. That means Adomig G3 creates a tagged value for activities and inserts a link to the application / IT system.
- Tagged Value name – the tagged value name to be used if tagged value mapping is selected (see previous point).
- Use value list in TGV (instead of more with a numbered suffix) – if tagged value mapping is selected (see previous points), more applications are mapped to the relevant activity and this option is checked, a tagged value of the List type will be created. It is therefore possible to map multiple applications to one tagged value. If this option is not checked, one tagged value will be created for the relevant activity for each mapped application / IT System according to the previous point, with a numbered suffix, for example Supporting IT App_1, Supporting IT App_2, etc.
- Use the relation from IT App to Process Activity – the tagged value will not be used for mapping but a link in the direction from Application / IT System to a process activity.
- Use the relation from Process Activity to IT App – the tagged value will not be used for mapping but a link in the direction from a process activity to Application / IT System.
- Used relation type / stereotype (You can write your own) – defines the type of used link. If the user knows the exact type or stereotype, he/she can enter it manually.
- Stereotype for the relation – if an association or dependency is selected in the type of link and this editing field is filled in, its content is inserted into the link as a stereotype. The relevant stereotype is also inserted in the list of stereotypes of the EA project.
Pool / Lanes Type (3)
- Use only pools – lanes will not be used during migration, only pools. This option is not recommended for imports from Adonis.
- Use only lanes – only lanes will be used during migration. This option is recommended for imports from Adonis.
- Use pools and lanes – this option is not currently available (for Adonis). It will be used when it is imported from Adonis / Aris from BPMN notation.
- Do not use pools and lanes – if this option is selected, no pools or lanes will be used at all, and the elements will be placed directly in the diagram.
Pool / Lanes Type (4)
- Do not classify pools and lanes (use only names) – imported pools and lanes will not be classified by another element (Instance Classifier in EA) but only named.
- Combobox – type of element that will be created in <Select Role Root> if it is not found.
RACI Configuration
It is the configuration of responsibilities for individual process activities. RACI stands for Responsible (for execution), Accountable, Consult and Inform. This form consists of four sections (and one preset). The elements of the control sections have the same meaning and concern only different responsibilities. Therefore, only one is described in this manual – the behaviour of the others is the same.
This configuration form corresponds to the <Select RACI Root> package.
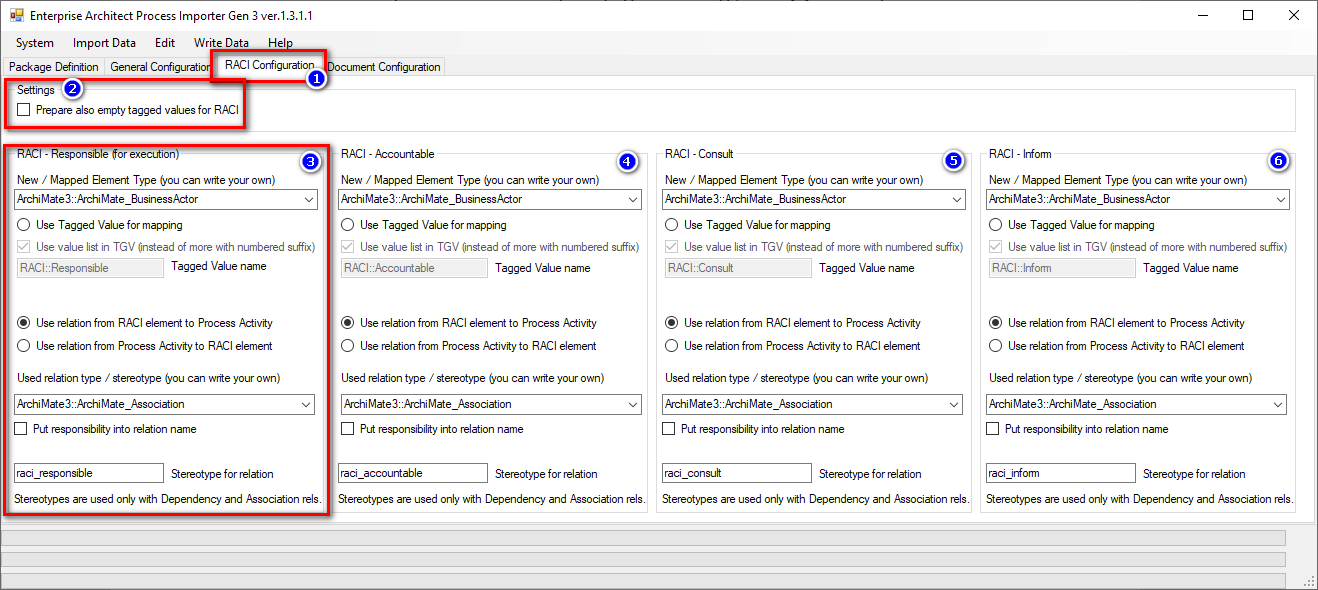
- Prepare also empty tagged values for RACI (2) – if the mapping type Use Tagged Value for Mapping is selected in the RACI – Responsible for execution (3) section, the Adomig G3 application will also create empty tagged values, i.e. also for activities where no system is actually mapped. This option can be used to prepare a tagged value so that it can be easily used later in EA, and the user does not always have to create it manually. This behaviour is similar to that already described for applications.
Items in the RACI – Responsible for Execution section (3)
- Combobox named New / Mapped Element Type (You can write your own) – this selection defines what type the newly created element will be (for example, the RACI responsibility that Adomig G3 should map to the activity but will not find it and must create a new one). These are, for example, ArchiMate Business Actor, UML Class, Actor, etc. The user can enter another type of element if he/she knows the correct type / stereotype and writes it to the combobox.
- Use Tagged Value for Mapping – if this option is checked, RACI roles will be mapped to activities using tagged values. That means Adomig G3 creates a tagged value for activities and inserts a link to the RACI role.
- Tagged Value name – the tagged value name to be used if tagged value mapping is selected (see previous point).
- Use the value list in TGV (instead of more with a numbered suffix) – if tagged value mapping is selected (see previous points), multiple RACI responsibilities are mapped to the relevant activity, and this option is checked. A tagged value of the List type will be created. It is therefore possible to map more of the same RACI roles to one tagged value. If this option is not checked, one tagged value will be created for the relevant activity for each mapped RACI role according to the previous point, with a numbered suffix, for example Responsible_1, Responsible_2, etc.
- Use the relation from RACI element to Process Activity – the tagged value will not be used for mapping, but a link in the direction from RACI Role to a process activity.
- Use the relation from Process Activity to RACI element – the tagged value will not be used for mapping but a link in the direction from a process activity to RACI Role.
- Used relation type / stereotype (You can write your own) – defines the type of used link. If the user knows the exact type or stereotype, he/she can enter it manually.
- Stereotype for the relation – if an association or dependency is selected in the type of link and this editing field is filled in, its content is inserted into the link as a stereotype. The relevant stereotype is also inserted in the list of stereotypes of the EA project.
Document Configuration
It is a configuration of documents that serve as inputs/outputs/references for individual process activities. This form consists of three sections (and one preset). The elements of the control sections have the same meaning and apply only to different uses (in/out/references). Therefore, only one section is described in this manual – the behaviour of the others is the same.
This configuration form corresponds to the <Select Material / Document Root> package.
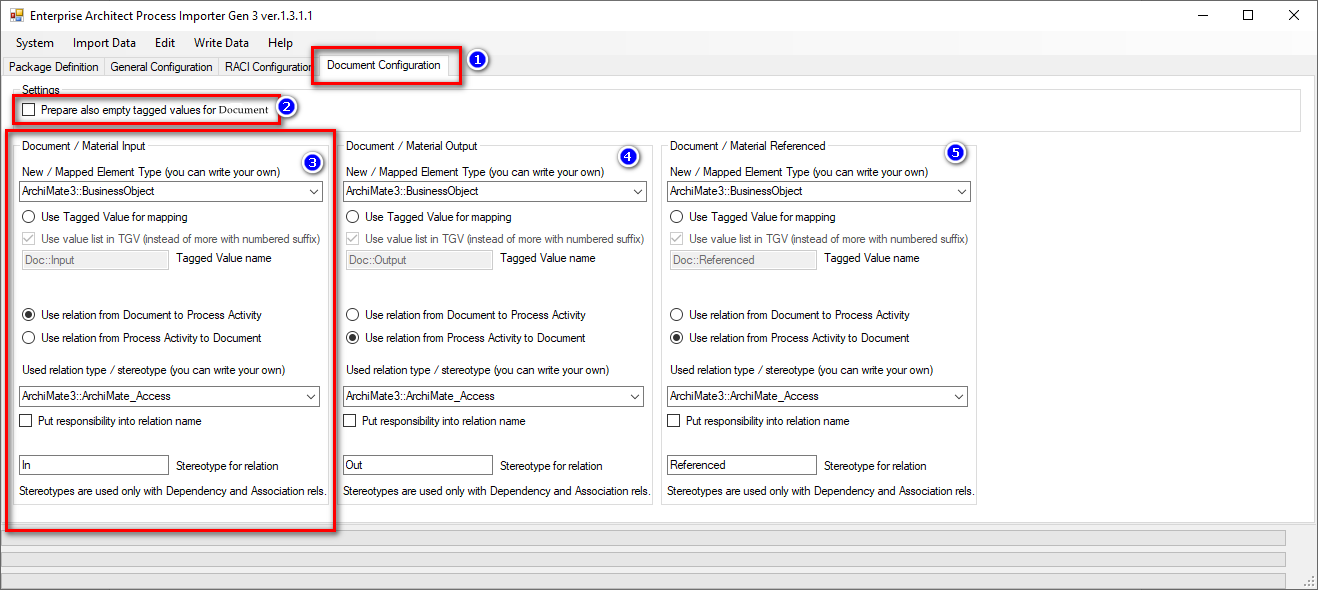
Prepare also empty tagged values for Document (2) – if the Mapping type Use Tagged Value for mapping is selected in the Document / Material Input (3) section, Adomig G3 will also create empty tagged values, i.e. also for activities where there is no document actually mapped. This option can be used to prepare a tagged value so that it can be easily used later in EA, and the user does not always have to create it manually. This behaviour is similar to that already described for applications and RACI.
Items in the Document / Material Input section (3)
- Combobox named New / Mapped Element Type (You can write your own) – this selection defines what type the newly created element will be (for example, the document that Adomig G3 should map to the activity but will not find it and must create a new one). These are, for example, ArchiMate Business Object, UML Class, Contract, etc. The user can enter another type of element, if he/she knows the correct type / stereotype and writes it to the combobox.
- Use Tagged Value for Mapping – if this option is checked, documents will be mapped to activities using tagged values. That means Adomig G3 creates a tagged value for activities and inserts a link to the document.
- Tagged Value name – the tagged value name to be used if tagged value mapping is selected (see previous point).
- Use the value list in TGV (instead of more with a numbered suffix) – if tagged value mapping is selected (see previous points), more documents are mapped to the relevant activity, and this option is checked. A tagged value of the List type will be created. It is therefore possible to map multiple documents to one tagged value. If this option is not checked, one tagged value will be created for the relevant activity for each mapped document according to the previous point, with a numbered suffix, for example Input Document_1, Input Document_2, etc.
- Use the relation from Document to Process Activity – a tagged value will not be used for mapping, but a link in the direction from document to a process activity.
- Use the relation from Process Activity to Document – a tagged value will not be used for mapping, but a link in the direction from a process activity to document.
- Used relation type / stereotype (You can write your own) – defines the type of used link. If the user knows the exact type or stereotype, he/she can enter it manually.
- Stereotype for the relation – if an association or dependency is selected in the type of link and this editing field is filled in, its content is inserted into the link as a stereotype. The relevant stereotype is also inserted in the list of stereotypes of the EA project.
Performing custom import
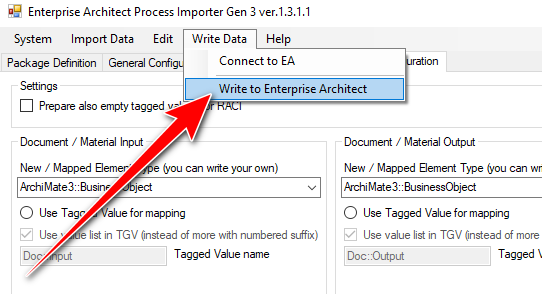
Now it remains to start a custom import. It is done with the command Main Menu / Write Data / Write to Enterprise Architect.
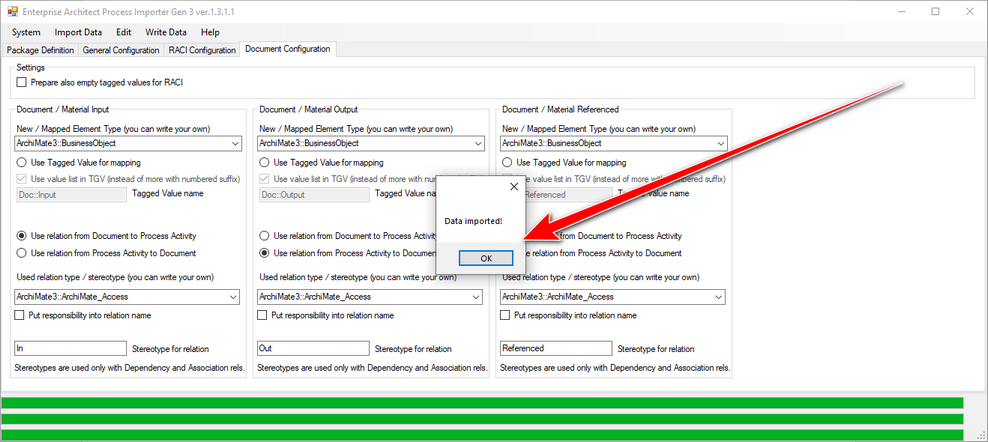
The library data is loaded and then the custom import of processes takes place. When the import is complete, a confirmation message is displayed.
Checking imported data
It is now possible to open the EAP file with Enterprise Architect and check the imported processes.
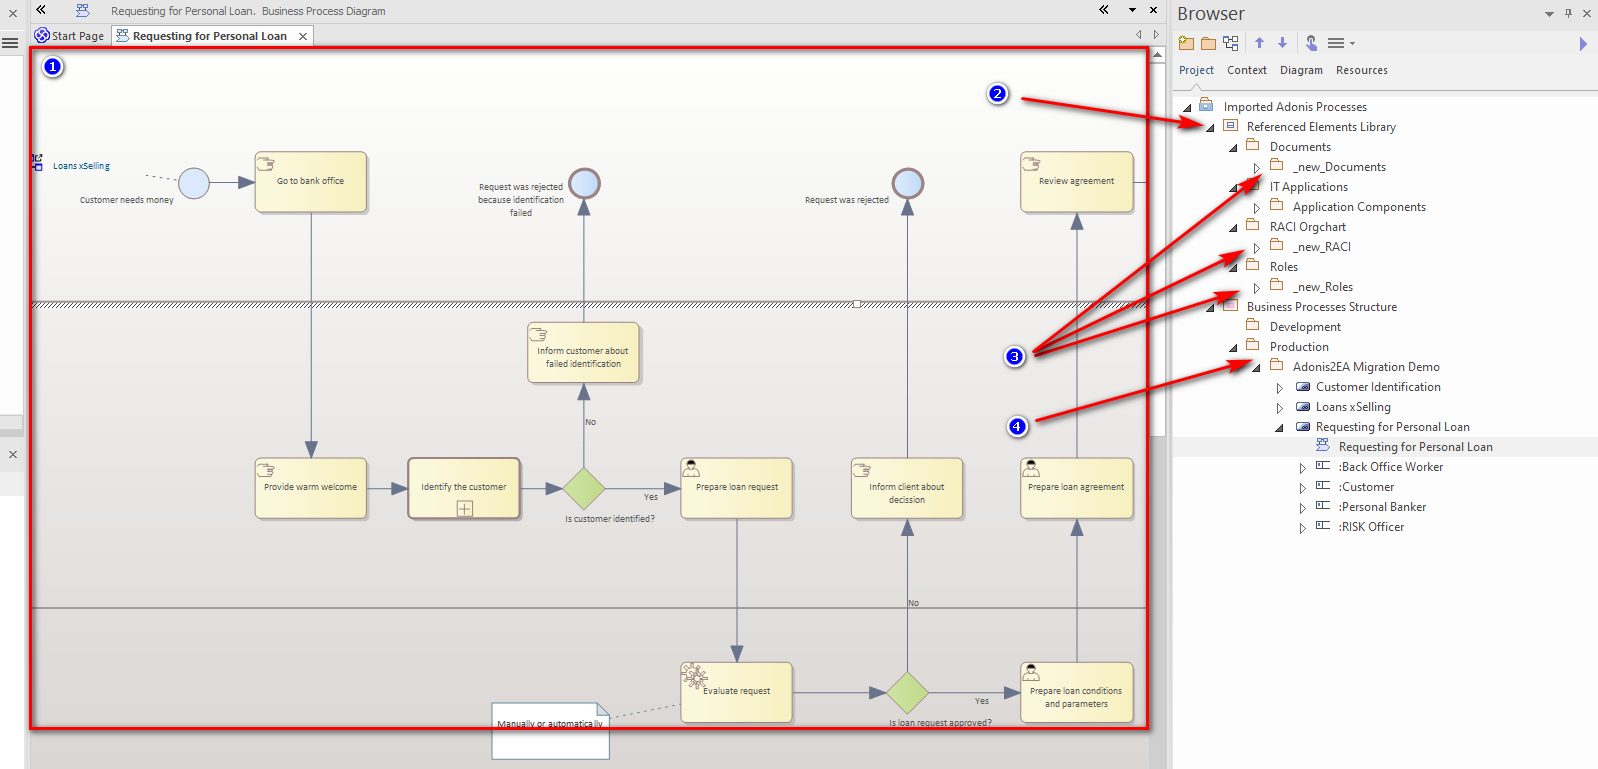
- Imported process.
- Root package of library elements.
- Package for newly created elements.
- Imported processes.
For any questions, comments, licensing questions or suggestions for new features, please contact us.
